How to Create & Publish WFS (Web Feature Services) in GeoServer.
తెలుగులో నేర్చుకుందాం
What is WFS?
Publishing Vector Data as WFS
Create WFS
- Once the layers/layer groups added to Geoserver, it’s time to publish the data as WFS. Go through the steps of publishing a Shapefile with GeoServer
- Click on the GeoServer logo at the top left corner as shown in the figure 42
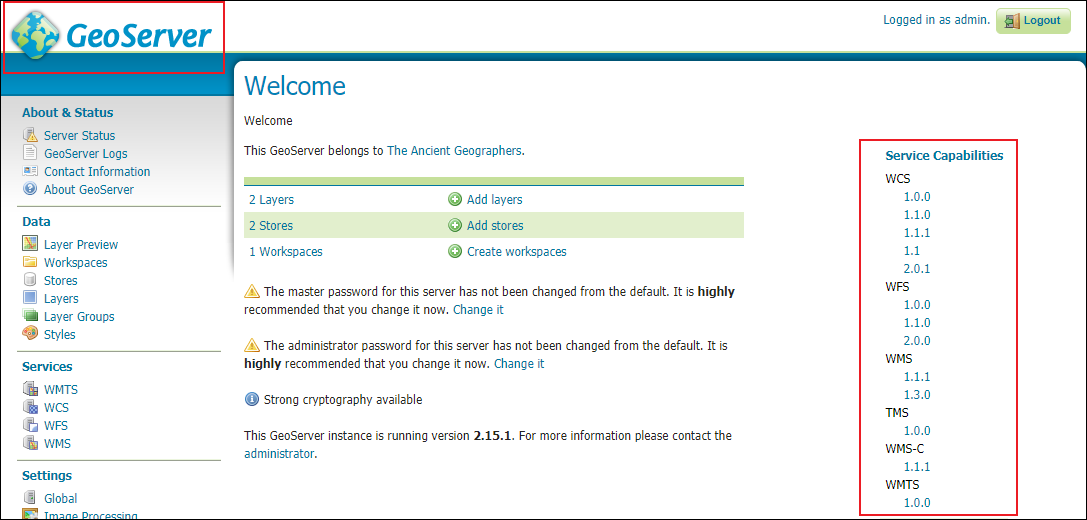
Figure 42 - Geoserver Welcome page
- On the right side of the page, WCS, WFS, WMS, TMS, WMS-C & WMTS services capabilities will be displayed
- Under WFS right click on 2.0.0 and copy link address and paste it in notepad.

Figure 43 - Copy link address
- The current version of WFS is 2.0.0. GeoServer supports versions 2.0.0, 1.1.0, and 1.0.0. Although there are some important differences between the versions, the request syntax often remains the same.
- The major differences between the WFS versions are:
- WFS 1.1.0 and 2.0.0 return GML3 as the default GML, whereas in WFS 1.0.0, the default is GML2. GML3 adopts marginally different ways of specifying a geometry. GeoServer supports requests in both GML3 and GML2 formats.
- In WFS 1.1.0 and 2.0.0, the SRS (Spatial Reference System, or projection) is specified with urn:x-ogc:def:crs:EPSG:XXXX, whereas in WFS 1.0.0 the specification was http://www.opengis.net/gml/srs/epsg.xml#XXXX. This change has implications for the axis order of the returned data.
- WFS 1.1.0 and 2.0.0 support on-the-fly reprojection of data, which supports returning the data in a SRS other than the native SRS.
- WFS 2.0.0 introduces a new version of the filter encoding specification, adding support for temporal filters.
- WFS 2.0.0 supports joins via a GetFeature request.
- WFS 2.0.0 adds the ability to page results of a GetFeature request via the startIndex and count parameters. GeoServer now supports this functionality in WFS 1.0.0 and 1.1.0.
- WFS 2.0.0 supports stored queries, which are regular WFS queries stored on the server such that they may be invoked by passing the appropriate identifier with a WFS request.
- WFS 2.0.0 supports SOAP (Simple Object Access Protocol) as an alternative to the OGC interface – Source GeoServer

Figure 44 - WFS link pasted in notepad
- Add WFS to QGIS
In the browser panel, locate the WFS/OCG API features and right click it to add a new connection.
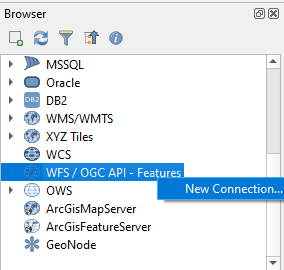
Figure 45 - Browser Panel in QGIS with WFS
- Name your connection. This is not the name of the layer but the name of service which is offering the WMS layer.
- Name the connection as India_Layers_Geoserver and the URL as http://localhost:8080/geoserver/ows?service=wfs&version=2.0.0&request=GetCapabilities (Reference – Figure 44).
- Under WFS Option - Select 2.0 in Version
- Click OK to add WMS to browser panel.
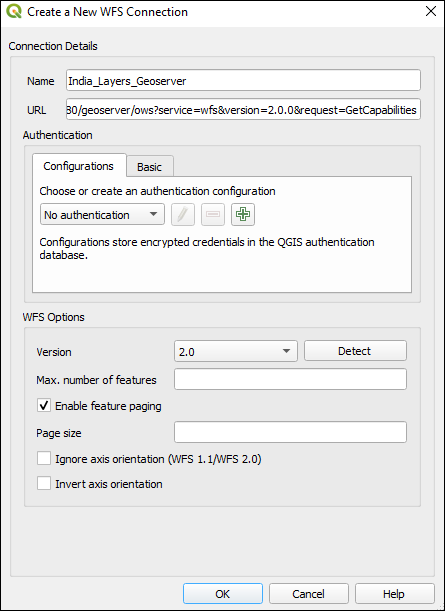
Figure 46 - WFS connection window

Figure 47 - WMS added to Browser Panel
- Double click on the layer fromWFS to add to layer panel.

Figure 48 - Displaying layer from Geoserver to QGIS through WFS
Before add/modify the WFS layers, go back to geoserver and change Data Security Settings.
- Go to GeoServer Main page
- Security → Data

Figure 49 - Data Security Page before adding rules to workspace
- Click on Add new rule
- Select the Workspace
- Select Layers & Groups
- Select * to select all layers in the workspace
- Or select the layer
Under Roles: click on Grant access to any role to assign roles to workspace or select individual role from the below table and Click on Save.

Figure 50 - Data access rule page
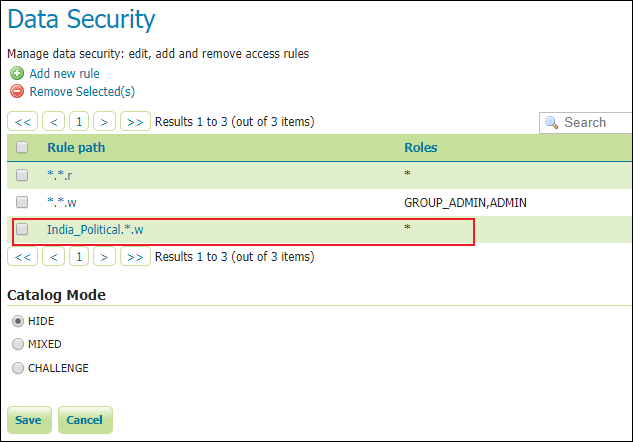
Figure 51 - Data Security Page after adding rules to workspace
- Now, go back Before QGIS and start add/modify the WFS layers.
- Sample WFS editing
- In the below given example (see figure 48) for editing WFS, parcel(state) will be splitted into 3 parts and merged back to single parcel. The changes will be seen in the layer added in the geoserver.
- Click on Toggle Editor in QGIS to start editing of WFS layer
- Select the parcel to be splitted and click on split features
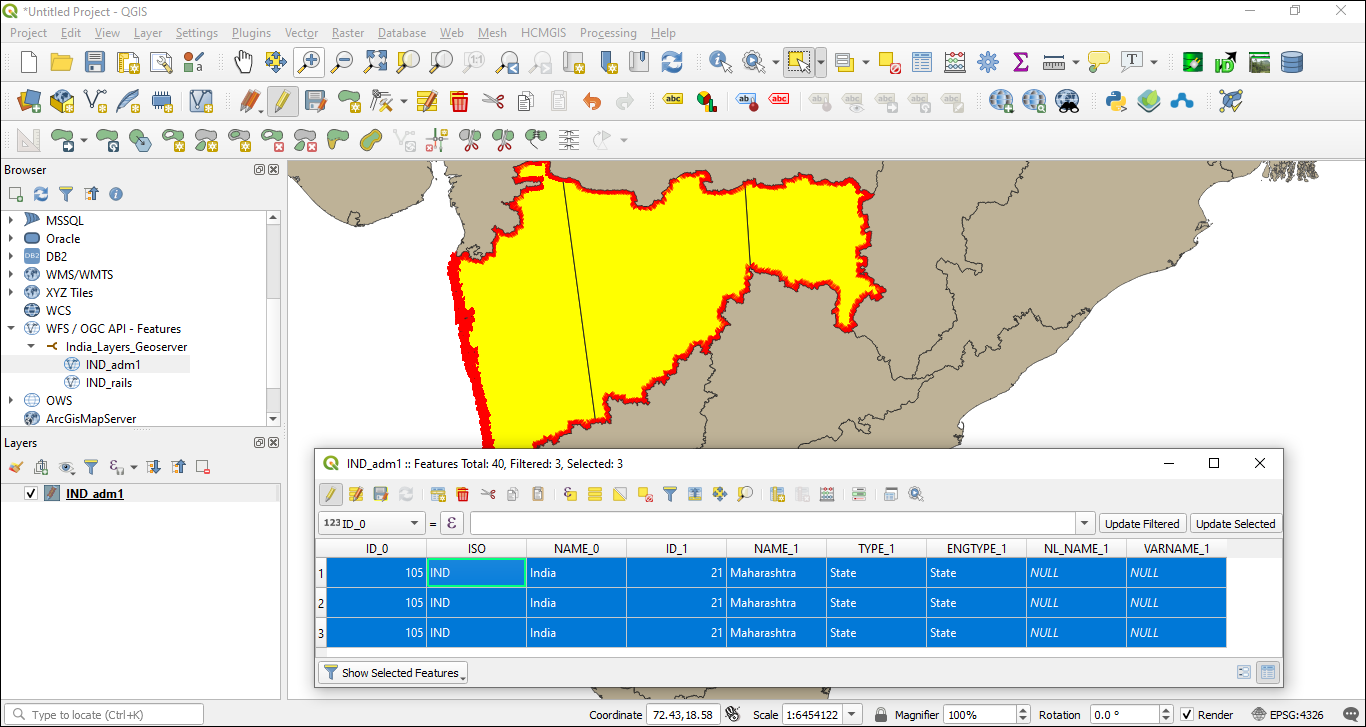
Figure 52 - Parcel split on WFS layer
- In the above example the selected parcel has splitted into 3 parts and the attributes of the same can be seen.
- Click on to save layer edits.
- Now, go back to Geoserver click on Layer Preview and choose the layer which was added to WFS and click on OpenLayer, to view the edits done on WFS.
Figure 53–Layer Preview of Splitted WFS layer
- Edits done on WFS in QGIS is successfully executed and saved online as well
- Now, back to QGIS and merge the splitted features
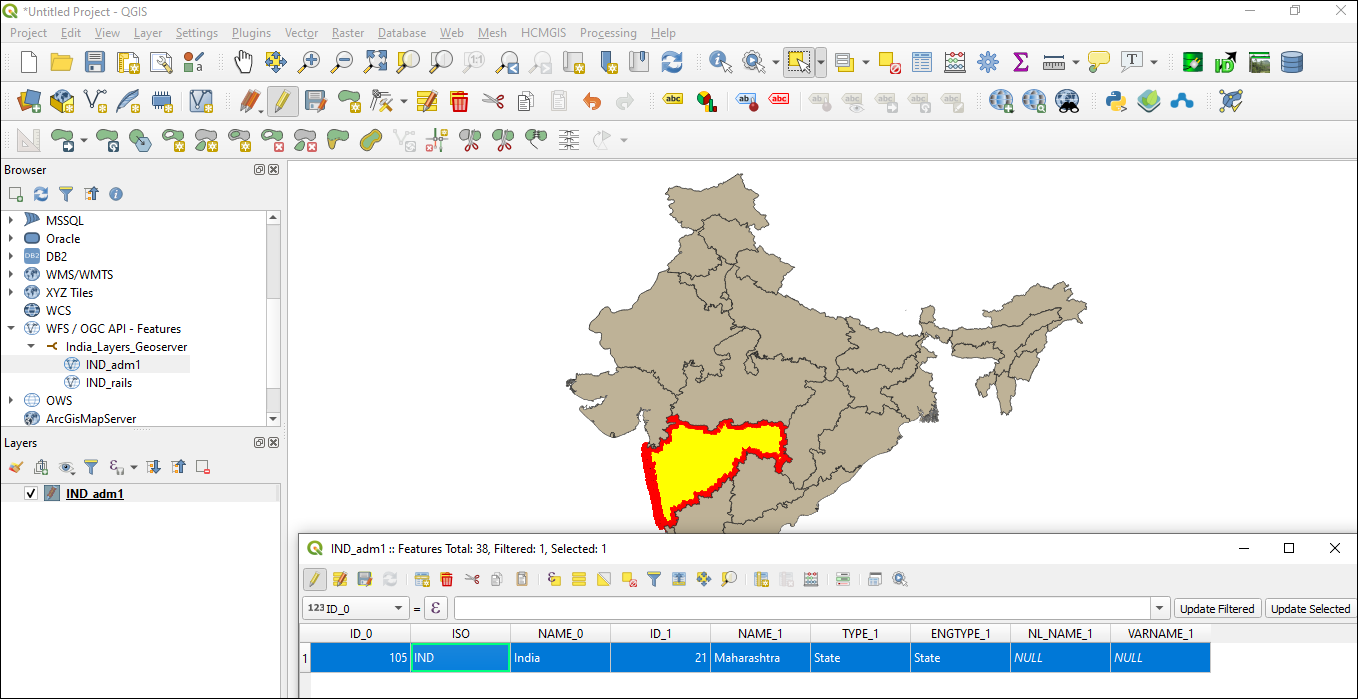
Figure 54 - Splitted parcel merged on WFS
- Click on to save layer edits.
- To view the saved edits, go back to Geoserver click on Layer Preview and choose the layer which was added to WFS and click on OpenLayer, to view the edits done on WFS.
Figure 55 - – Layer Preview of Merged WFS layer
Comments
Post a Comment