
Exercise – 13 / How to add Geometry to Attributes in QGIS తెలుగులో నేర్చుకుందాం

Exercise – 13 /  How to add Geometry to Attributes in QGIS


Add Geometry Attributes.

The geometry tool is an easy to use tool that allows you to add the following geometry values to points, lines, and polygons:

  • Point: The XCOORD and YCOORD columns will contain the x and y coordinates of the point
  • Line: The SHAPE_LEN column will contain the length of the record's line(s)
  • Polygon: The AREA and PERIMETER columns will contain the area and perimeter of the record's polygon(s).

Add Geometry Attributes for Point.

  • Add Point Layer to Layers panel

Figure 134 - Point layer for adding geometry

  • Open attribute table

Figure 135 - Attribute table before adding geometry

  • Choose Vector → Geometry tools →Add Geometry Attributes
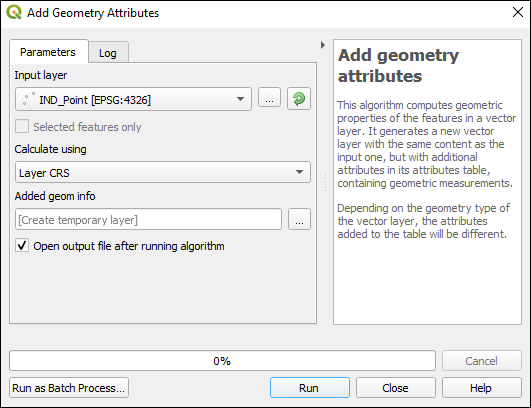
Figure 136 - Add geometry attributes window for Point

  • Select input layer (Ex: Ind_Point)
  • Select CRS from (Layer CRC / Project CRC / Ellipsoidal), better to select Layer CRS
  • Click on Run
  • Temporary layer will be created and added to Layer panel with Added geom info layer. Right click on the layer and save to destination folder.
  • Open the attribute table to see XCOORD and YCOORD columns added.

Figure 137 - Attribute table after adding geometry

Add Geometry Attributes for Line.

  • Add Line Layer to Layers panel and open attribute table

Figure 138 - Line layer with attribute data before adding geometry

  • Choose Vector → Geometry tools →Add Geometry Attributes
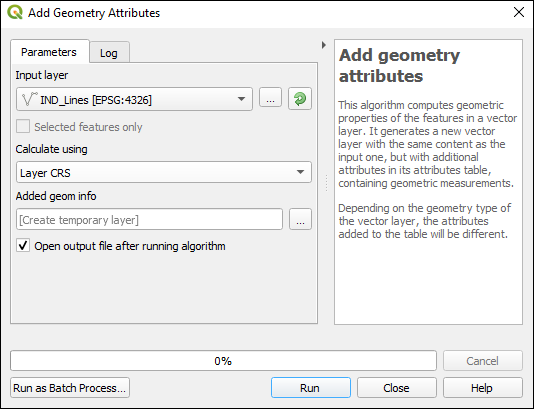
Figure 139 - Add geometry attributes window for Line


  • Select input layer (Ex: Ind_Lines)
  • Select CRS from (Layer CRC / Project CRC / Ellipsoidal), better to select Layer CRS
  • Click on Run
  • Temporary layer will be created and added to Layer panel with Added geom info layer. Right click on the layer and save to destination folder.
  • Open the attribute table to see length columns added.
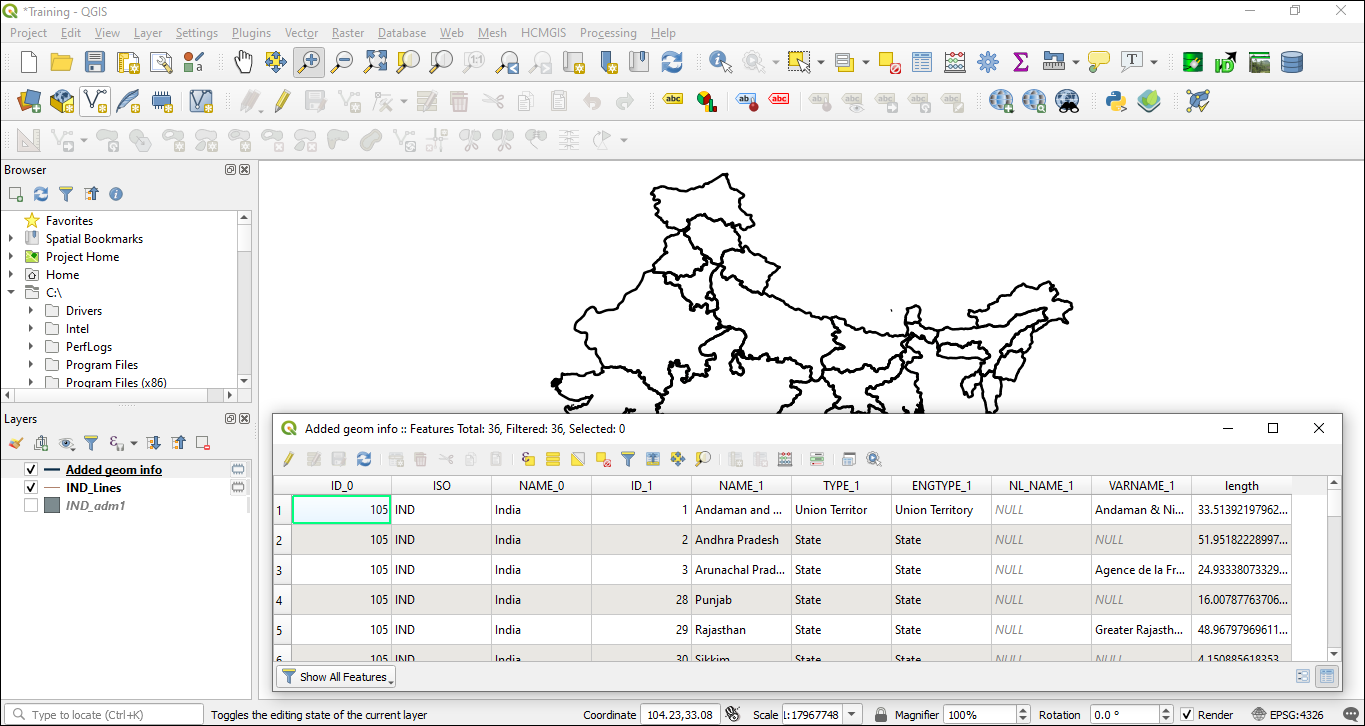
Figure 140 - Line layer with attribute data after adding geometry

Add Geometry Attributes for Polygon.

  • Add Polygon Layer to Layers panel and open attribute table
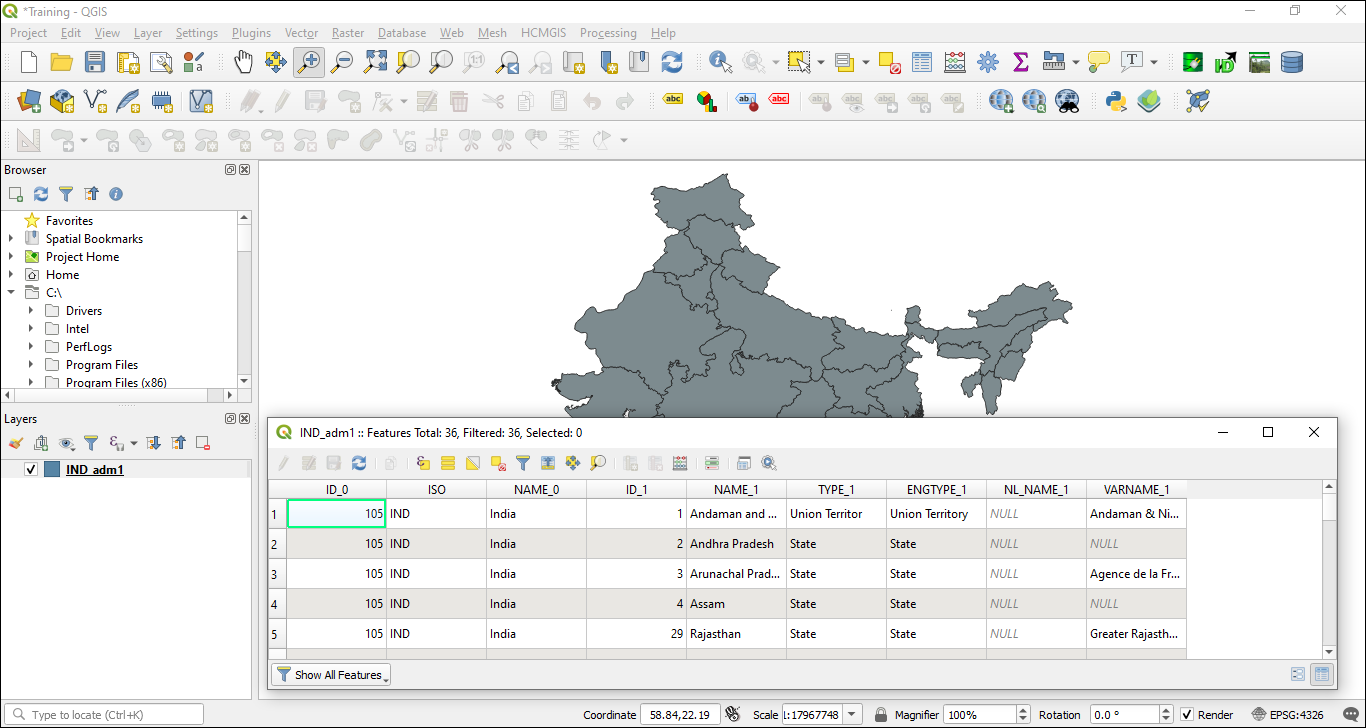
Figure 141 - Polygon layer with attribute data before adding geometry

  • Choose Vector → Geometry tools →Add Geometry Attributes

Figure 142 - Add geometry attributes window for Polygon

  • Select input layer (Ex: Ind_adm1)
  • Select CRS from (Layer CRC / Project CRC / Ellipsoidal), better to select Layer CRS
  • Click on Run
  • Temporary layer will be created and added to Layer panel with Added geom info layer. Right click on the layer and save to destination folder.
  • Open the attribute table to see area and perimeter columns added.

Figure 143 - Polygon layer with attribute data after adding geometry


Comments

Popular posts from this blog

How to Rename attribute fields in QGIS & How to Rearrange attribute fields in QGIS | తెలుగులో నేర్చుకుందాం

How to Rename attribute fields &  Rearrange attribute fields in QGIS Refactor fields Refactor fields, allows editing the structure of the attribute table of a vector layer. Fields can be modified in their type and name, using a field’s mapping. The original layer is not modified. A new layer is generated, which contains a modified attribute table, according to the provided fields mapping. Refactor layer fields allows to: Change field names and types Add and remove fields Reorder fields Calculate new fields based on expressions Load field list from another layer Add Vector Layer to Layers panel to Drop field(s) Choose Processing → Toolbox → Vector table → Refactor fields Figure 178 - Vector layer with attribute table before Refactor fields Select Input Layer (Ex: Ind_adm1) Select fields to be renamed and reorder (Ex: in the below given example Name_0 has to rename as Name with Length from 75 as 100 and change order of Name_1 under Name_0 [Name after rename] ) Figure 179 - Fi...

What is Survey Of India (SOI) Framework?

What is Survey Of India (SOI) Framework? The Survey of India (SoI) framework is a geospatial reference system used in India for mapping, surveying, and geodetic purposes. The framework is maintained by the Survey of India, which is the national mapping organization of India and the oldest scientific department of the Government of India. The SoI framework is based on the Indian Terrestrial Reference Frame (ITRF) and the Indian National Spatial Reference System (IN-SRS), and is used to determine the location and height of points on the Earth's surface with high accuracy. The framework is also used to define the horizontal and vertical reference systems for mapping and surveying purposes in India. The SoI framework provides a consistent and accurate basis for various geospatial applications, such as land management, urban planning, navigation, disaster management, and environmental monitoring. The framework is also used for the production of topographic maps, cadastral maps, and othe...

Exercise – 12 / How to Create GRID in QGIS తెలుగులో నేర్చుకుందాం

Exercise – 12 /  How to Create GRID in QGIS Create Grid Generate a line or polygon grid based on user-specified grid spacing. Add Polygon/Line/Point Layer to Layers panel for creating GRID Figure 150 - QGIS canvas with polygon layer added for creation of GRID Choose Vector →Research tools →Create Grid Select Grid Type (Point / Line / Rectangle / Diamond / Hexagon) Select Grid extent (Use canvas extent / select extent on canvas / use layer extent) Suggestedto select use layer extent and select the layer and click on OK . Provide Horizontal spacing in meters / kilometers / feet / miles / yards Provide Vertical spacing in meters / kilometers / feet / miles / yards Provide Horizontal overlay in meters / kilometers / feet / miles / yards (if required only, or else leave as 0) Provide Vertical overlay in meters / kilometers / feet / miles / yards (if required only, or else leave as 0) Select Grid CRS Click on Run Temporary layer will be created and added to Layer panel with Grid ...